Player's Handbook
Chapters
Welcome to the fantastic world of Jerrymapping! An artistic mapmaking experience inspired by the original work of Jerry Gretzinger, the creator of "Jerry's map". You will paint a world one small square at a time, and the world will surprise you.
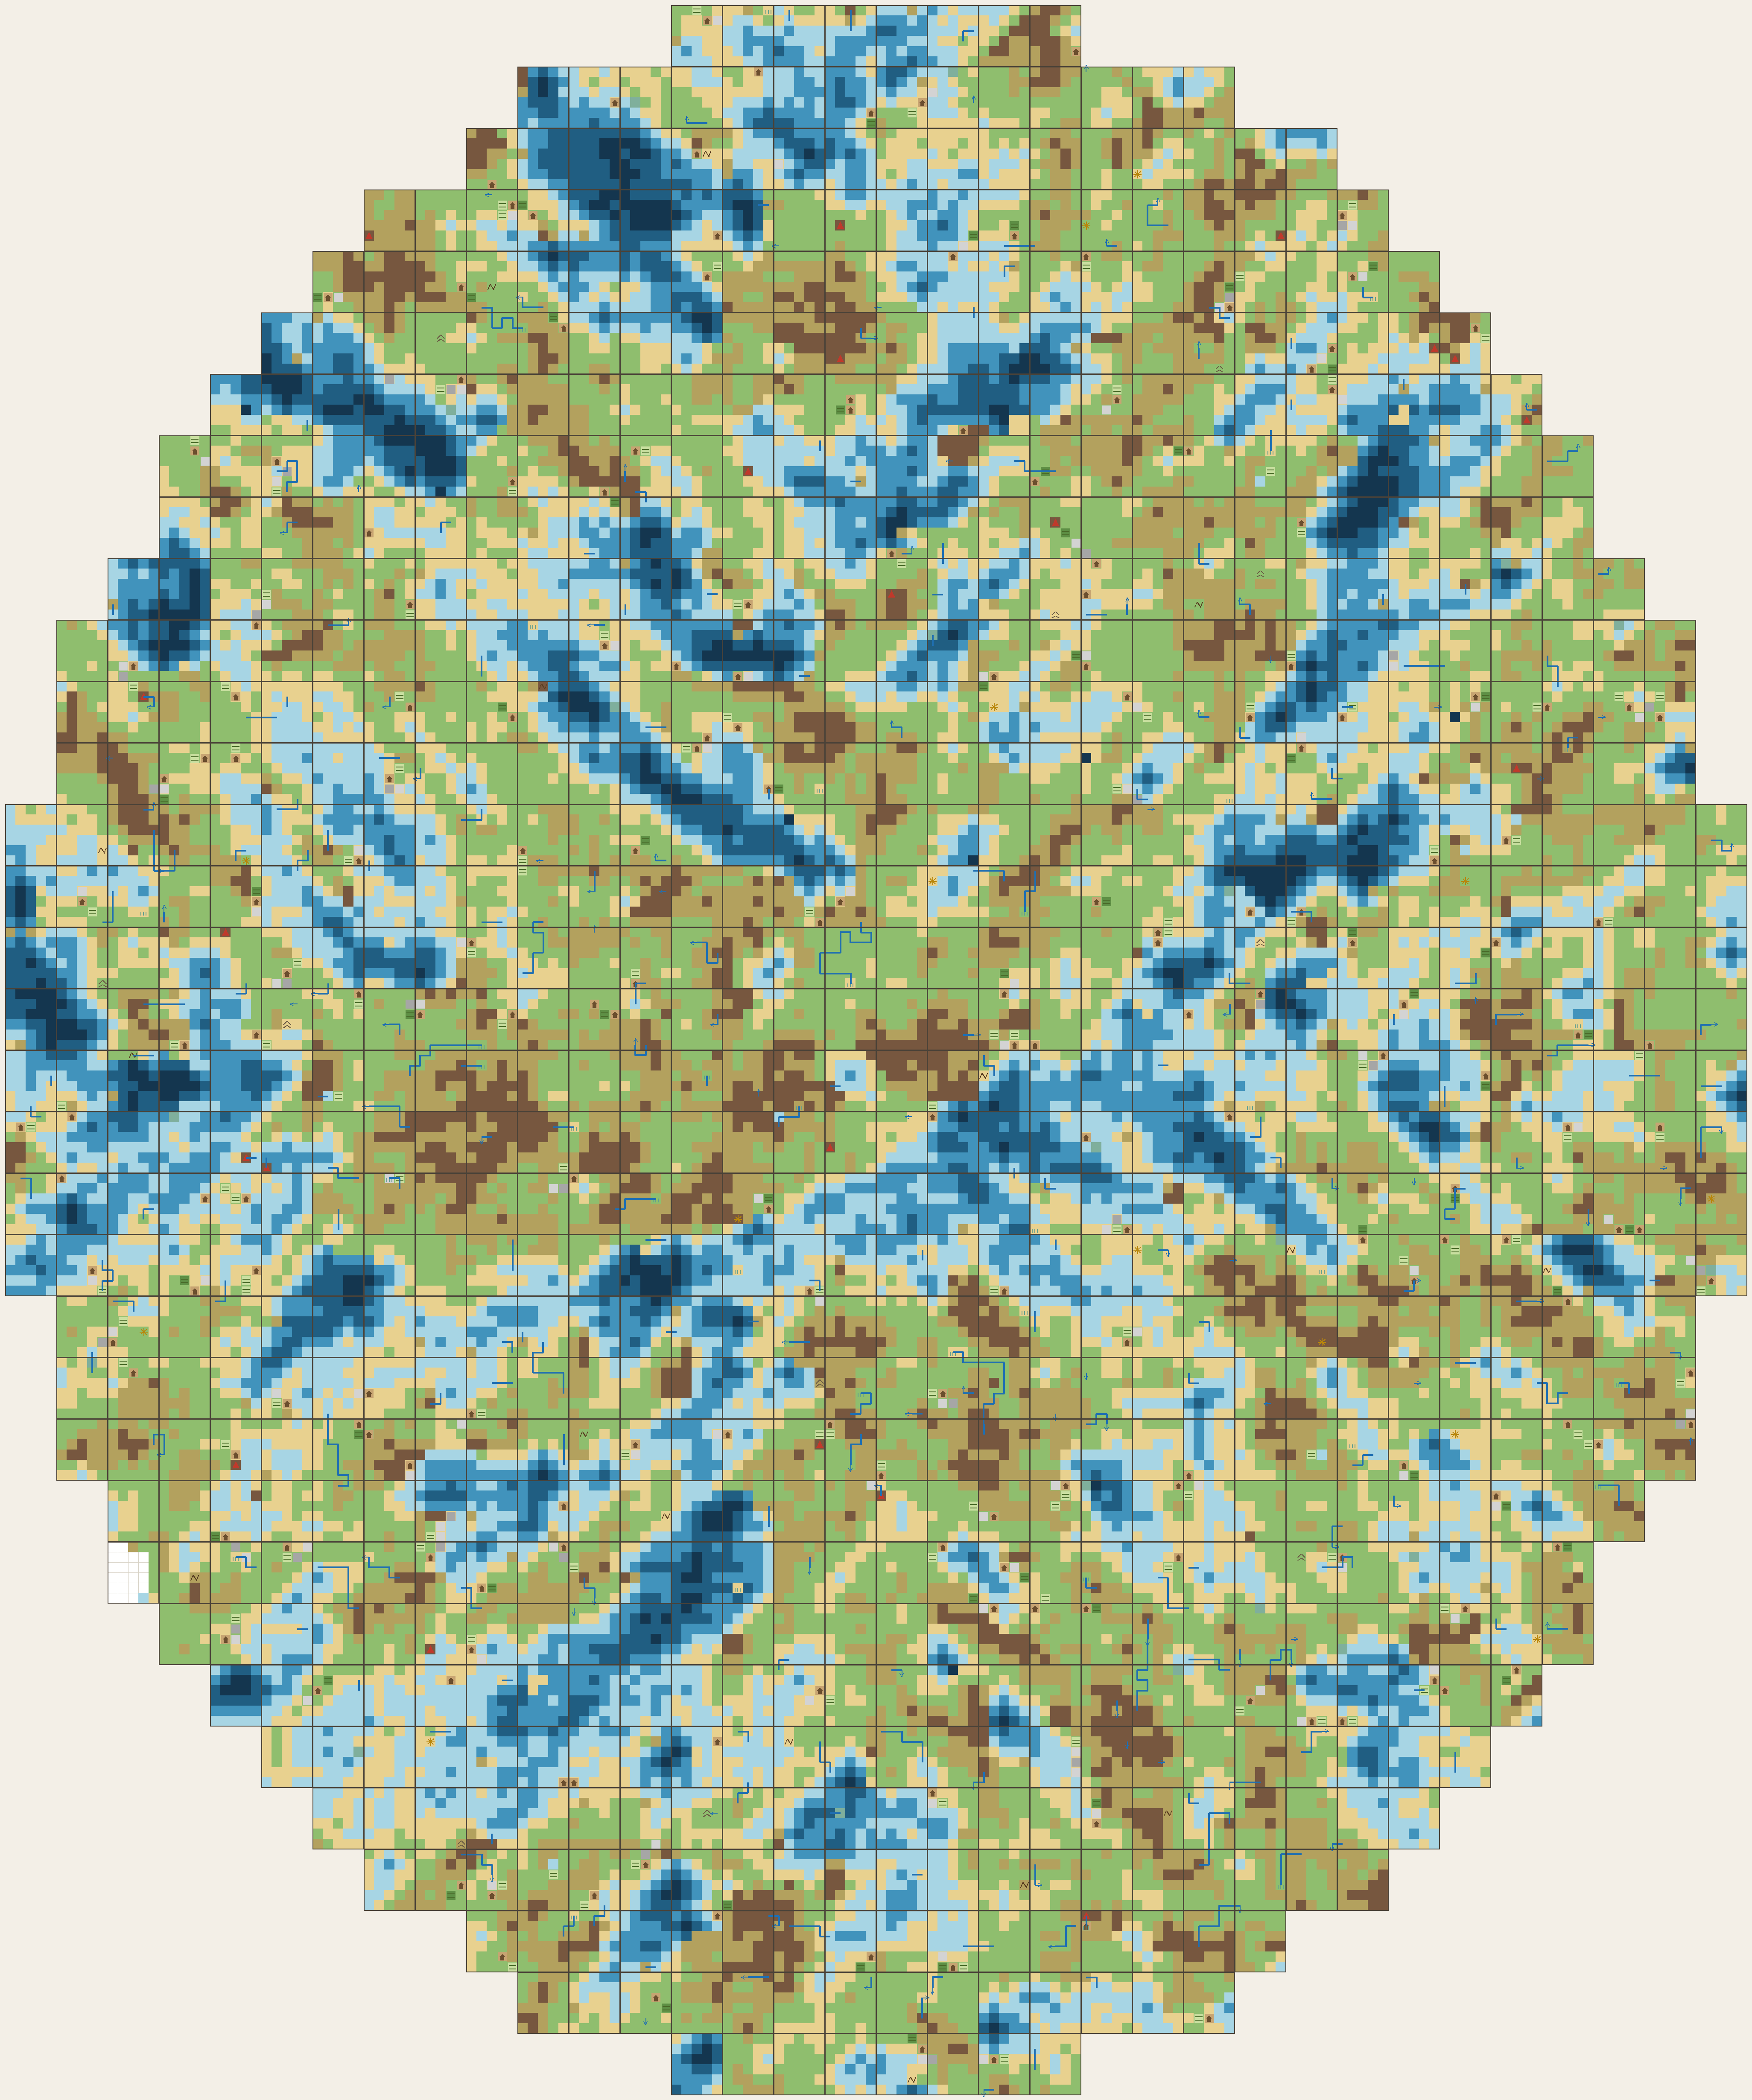
ggMapping is a pre-set system to jerrymapping for those who want to start right away without having to come up with a whole new system on their own.
This system has to be intended as a starting point, an initial guide to jerrymapping.
Every rule and sub-system can be interpreted and edited without fear, you're encouraged to make changes and make the system your own system!
Chapter 01
Introduction
This book keeps the rules light on purpose. If you're curious about how this manual came to be, or if you have any doubt about a specific rule, you can always refer to the full Master Manual. What you need from this system is small: one law that keeps the geography honest, a deck that paces the work, and a little randomness in the right places so the map stays wilder than your habits.
One more thing to keep in mind for your first rounds: at the beginning you will feel like not doing much, painting might look not coherent and cards' instructions less effective. Be patient, keep drawing cards and painting units! The chain of painting will turn your initial panels into a flowing landscape, one visit at a time. Follow the system, trust in the cards, and your map will very soon turn into something amazing.
What you need:
- Paper panels and something to paint with.
- The deck of 22 cards (chapter 6).
- A d6 and a d4, or any randomizer you like: a coin, a phone, honest eyes.
The panels
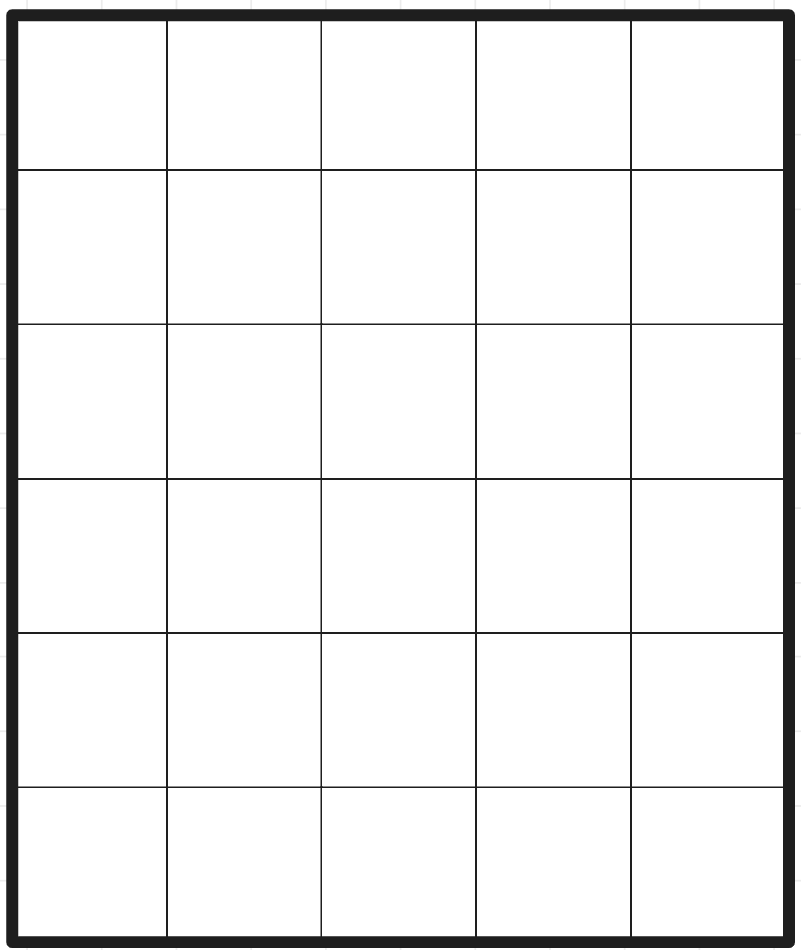
The standard panel size in this manual is small, a pocket size, something you can bring with you in a coffee shop to work and assemble in a kitchen table. But the system work well with any panel size with just a few intuitive adjustment
Pocket size (standard):
- Grid units: 5x6 units
- Unit Size: 1.5cm square (5/8″)
- Panel Size: 7,5 x 9cm (3 1/8″ x 3 3/4″)
Full size (Jerry's map size):
- Grid units: 8x10 units
- Unit Size: 2.5cm square (1″)
- Panel Size: 20 x 25cm (8″x10″)
The exact rules: Master Manual, chapters 1 to 3.
Words of the game
| Word | Meaning |
|---|---|
| Unit | One small square of a panel |
| Panel | One sheet of the map, a matrix of units |
| Full Panel | A panel where all units have been painted |
| Base | A unit's ground: its elevation |
| Overlay | Anything drawn on top of the base |
| Stack | The pile of panels waiting for work |
| Spread | The current panel with its map neighbors laid around it |
| Work number | How many units a card fills |
| Rework or Embellishment | Decorating filled units without changing their base elevation |
| Age, Era | One executed card is one age; 25 ages are one era |
Starting your first map
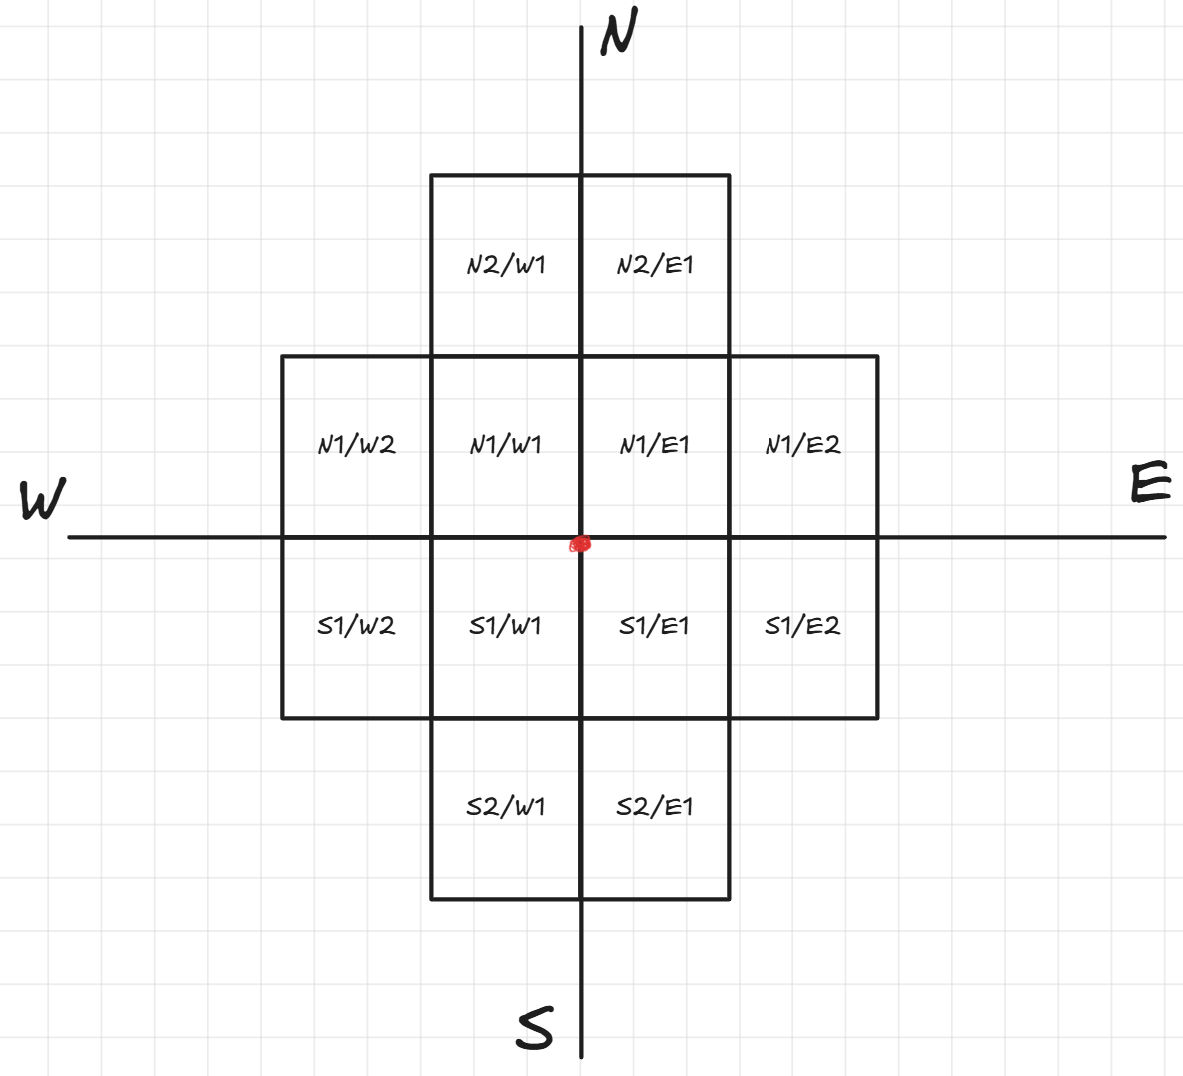
A new map starts with 12 blank panels in your stack, disposed as in the image below
Chapter 02
The turn
Your map is a growing grid of paper panels, each a small matrix of units. Mark each panel's coordinates on the back, bottom right relative to north. Unworked order lives in a stack of panels.
Each turn:
- Draw a card from the deck.
- Take the front panel of the Stack and lay its map neighbors around it, up to four (up, down, left, right), this is "the Spread". If the card is Add Panel, skip this step: the new panel you place is your working panel.
- Do the card's instruction, if it has one (chapter 6).
- Fill units up to the card's work number (chapter 4).
Is the panel already completely filled? Then:
- Do reworks up to the card's work number. (chapter 7)
- The panel's tallest settlement gets one growth step. (see Settlement card)
- Put everything back. The played card to the front of the deck, the Spread to its places, the panel to the back of the Stack. A full panel may retire to an archive instead (see notes).
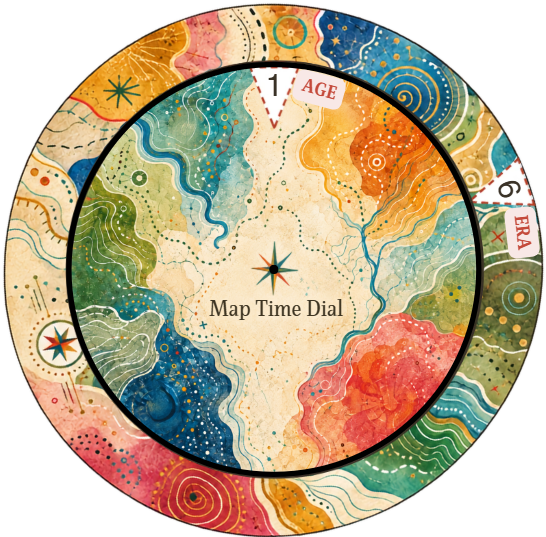
- Advance the calendar one age. Every 25 ages, a new era starts. Mark age and real date on the worked panel's back.
NOTES:
- Shuffle the deck once at the start and mark the bottom card. Each time the marked card comes round, shuffle again and mark anew.
- When a panel is full (completely painted), you can decide to put it in an "archive" instead of the working stack. Panels archiving helps to paint new maps faster and it keeps bigger maps manageable.
Have a look at this time dial that you can print and assemble by yourself. Decorated version -> https://drive.google.com/file/d/1n1EbJtwI5MI_7IphLmpX9bVZUhJIzxFq Plain version for you to decorate -> https://drive.google.com/file/d/14Y3d_Emow5Kj42nTOfvZ2p4-UC-NnY6y/
The exact rules: Master Manual, chapters 2, 5 and 6.
Chapter 03
One law: The Step Rule
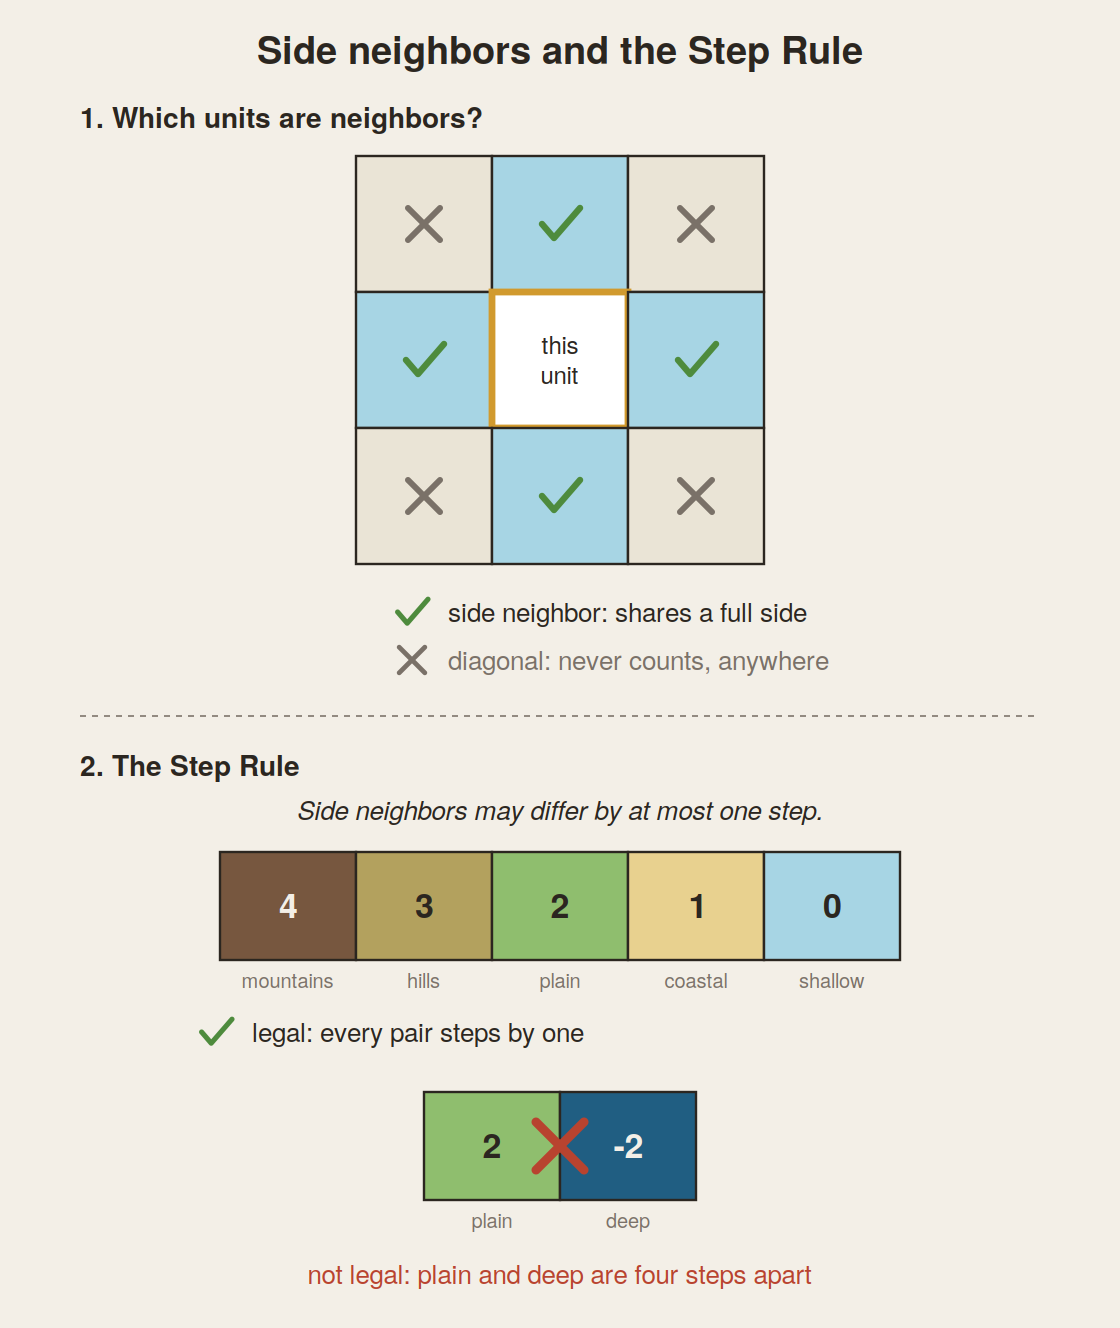
A unit and its side neighbor may differ by at most one elevation step.
That is the Step Rule, and it is nearly the whole game! Hold to it and geography draws itself: shores grow shallow rims, seas darken step by step, peaks never stand in meadows.
The elevation ladder
| Elevation | Side | Step |
|---|---|---|
| Mountains | land | 4 |
| Hills | land | 3 |
| Plain | land | 2 |
| Coastal | land | 1 |
| Shallow | water | 0 |
| Medium | water | -1 |
| Deep | water | -2 |
| Very deep | water | -3 |
- Coastal is the only door between land and water: coastal 1 touches shallow 0.
- Side neighbors share a full side. Diagonals never count, here or anywhere.
- The law works across panel borders.
- Anomaly units (chapter 6) are the one exception: they restrict nothing.
The exact rules: Master Manual, chapter 4.
Chapter 04
Filling guide
Filling is the process of painting one unit, thus giving a unit its own base elevation
Here are few simple filling steps that you need to apply to each unit (one by one) you want to fill:
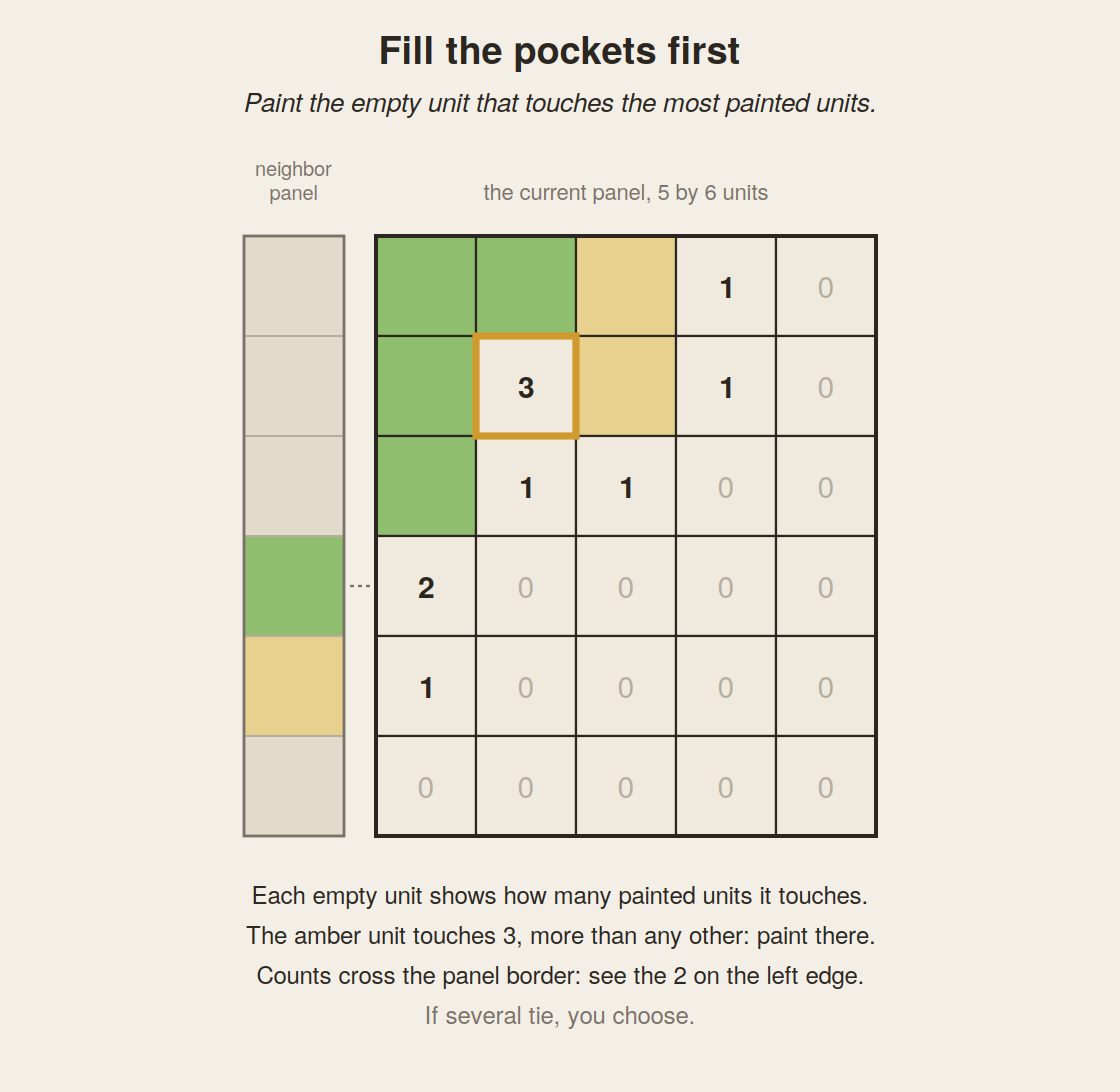
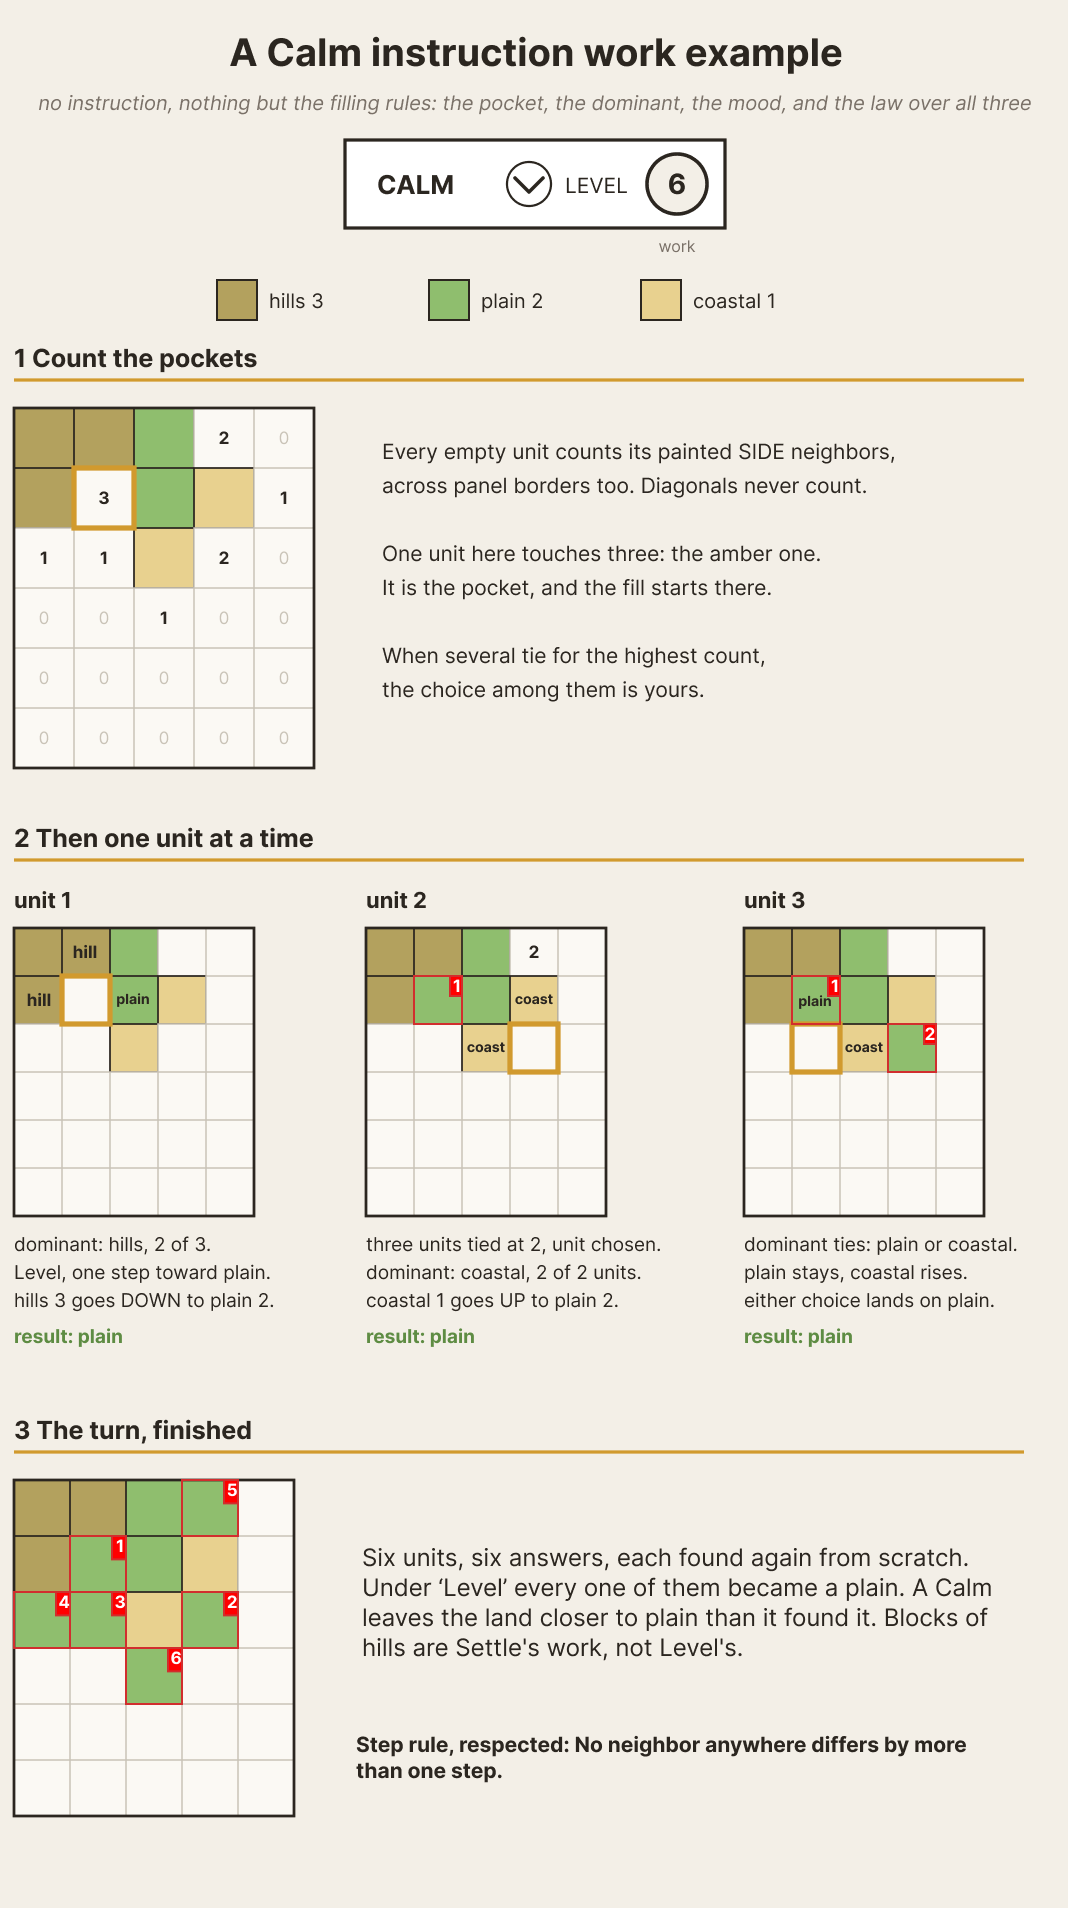
Choose a unit to fill -> Fill the pockets first. Paint the empty unit touching the most painted units, across borders too. Ties or blank panel: choose a pocket that pulls the map toward something you love, or randomize with dice.
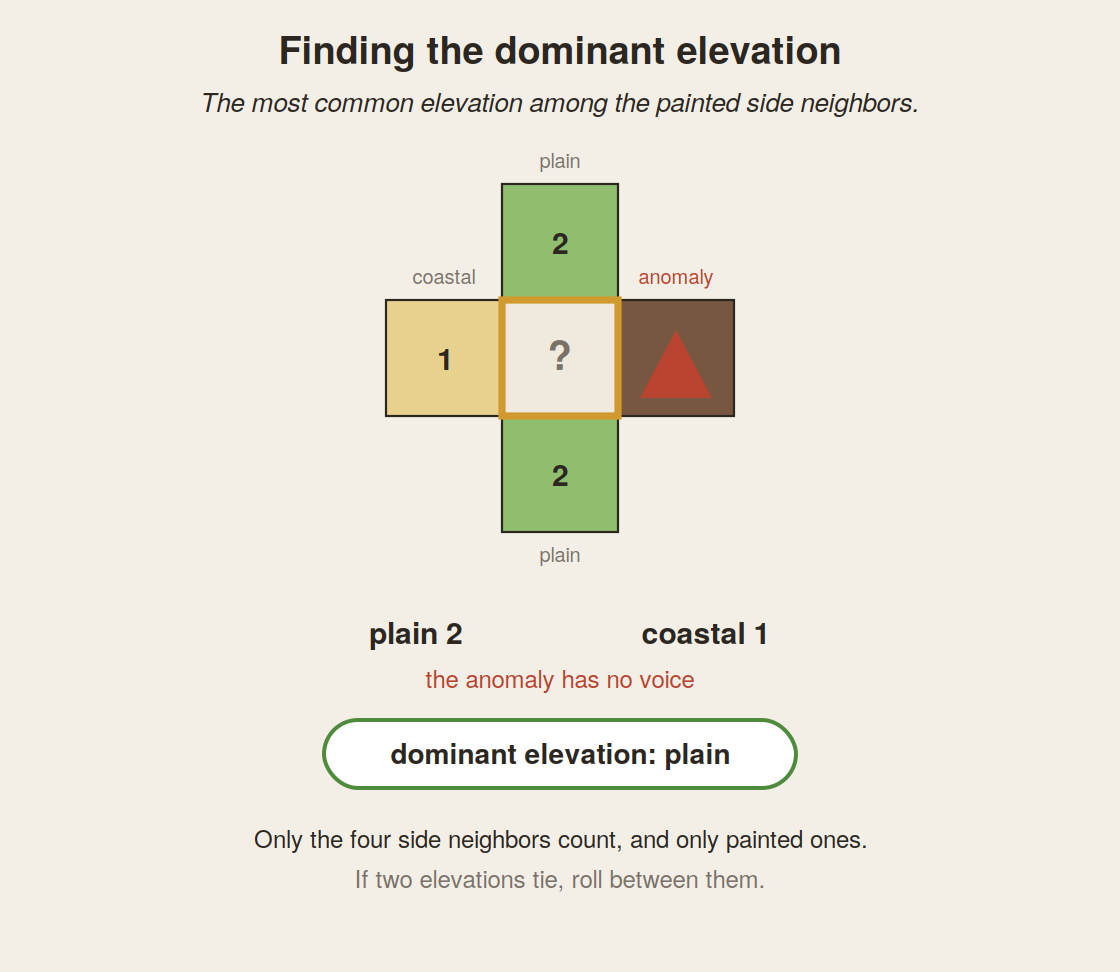
Find the dominant elevation. Take the most common elevation among painted side neighbors (up-down-left-right). Anomaly units never count here: they have no elevation voice.
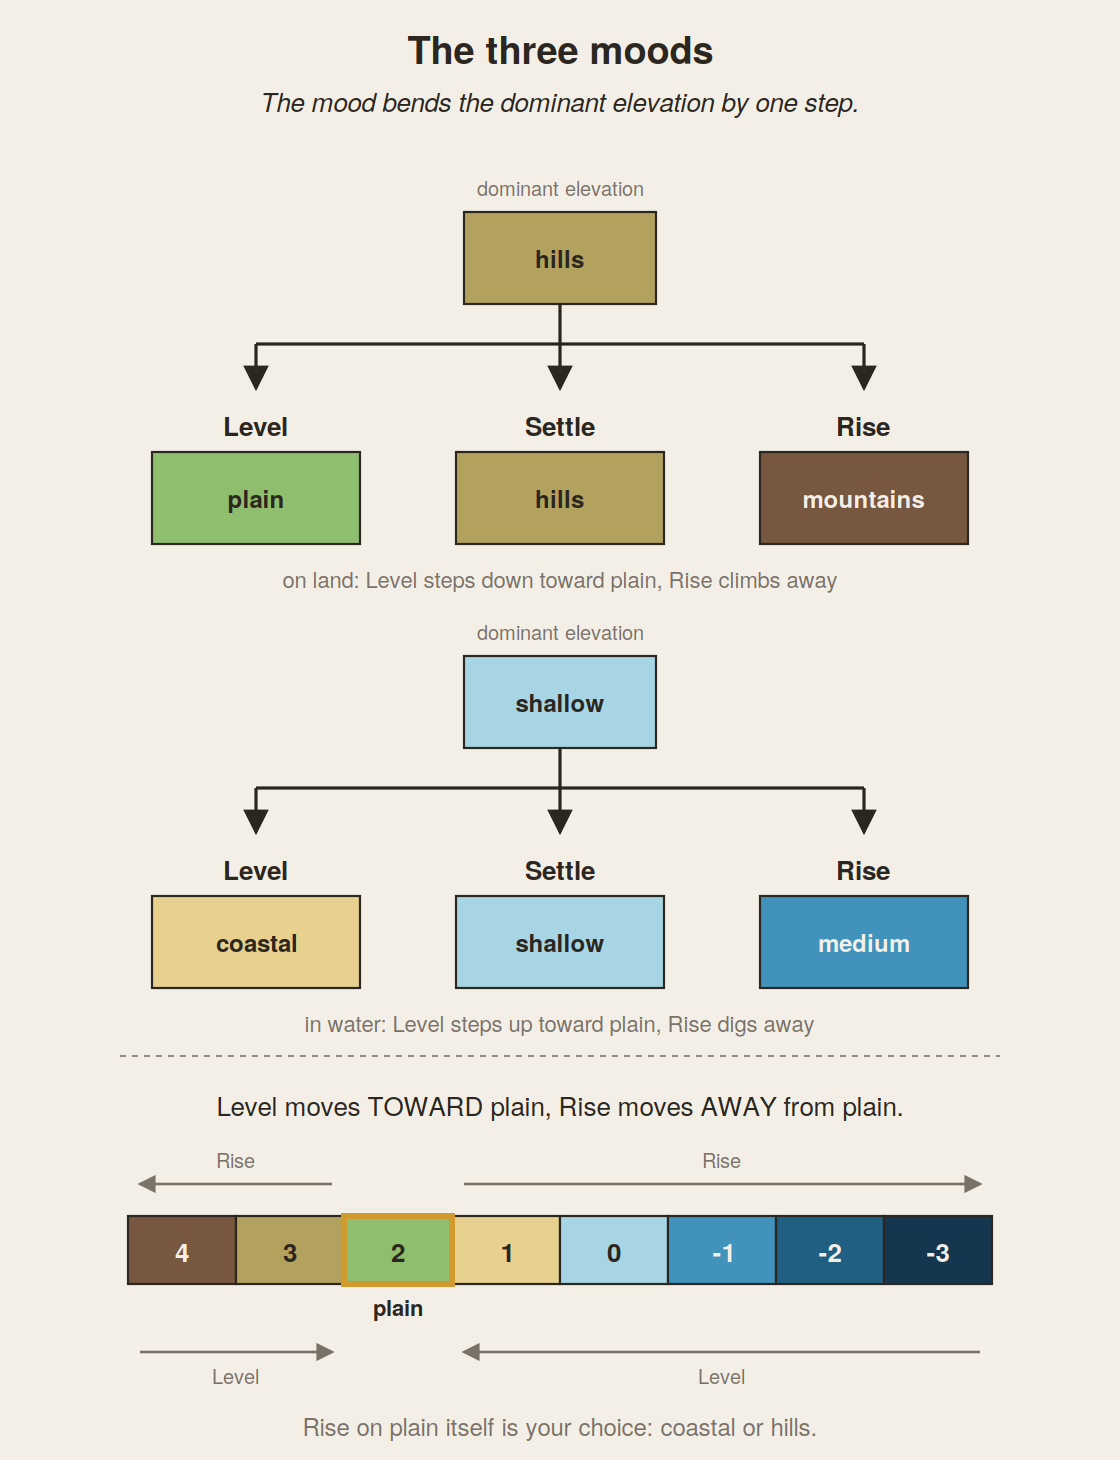
Apply the card's mood After finding or choosing the dominant elevation, you need to shift that elevation according to the card's commanded "mood":
- Settle keeps the same elevation.
- Level moves one step toward plain.
- Rise moves one step away; Rise on plain is your choice of coastal or hills.
NOTE: Level keep Plains unchanged and Rise carry on mountains as well as deep waters.
- PAINT THE UNIT! After following the previous steps, now you know which unit to fill and which elevation to be applied, time to fill it. There are no standard colors for the various elevations and features, you are free to chose your own palette or even your own system for picking colors. Just make sure elevations are recognizable to you. What you might see as a completely green panel in the simulator, can be an amazing painting artwork in your panel.
ATTENTION!
The filling steps are applied to each single unit to fill. Each painted unit affects the next one.
If a card tells to fill 6 units then, for each unit, you need to repeat the 3 steps: Find the unit to fill, find the dominant elevation, apply the mood, paint.
Filling rules:
- First paint on empty ground? (a new map, a fresh panel): roll a d6.
| d6 | First elevation |
|---|---|
| 1 | Shallow |
| 2 | Coastal |
| 3-4 | Plain |
| 5 | Hills |
| 6 | Mountains |
- Chain. Units painted earlier in the visit count for everything after: one visit grows a connected patch, not scattered dots.
- The law decides. If the wanted elevation breaks the Step Rule, take the nearest step that does not. If no step works, satisfy the lowest neighbor and paint one step above it: that jump is a cliff, and cliffs are not mistakes.
If all the units in a panel are already painted, the rest of the work becomes rework (chapter 7).
The exact rules: Master Manual, chapter 7.
Chapter 05
A stroke, step by step
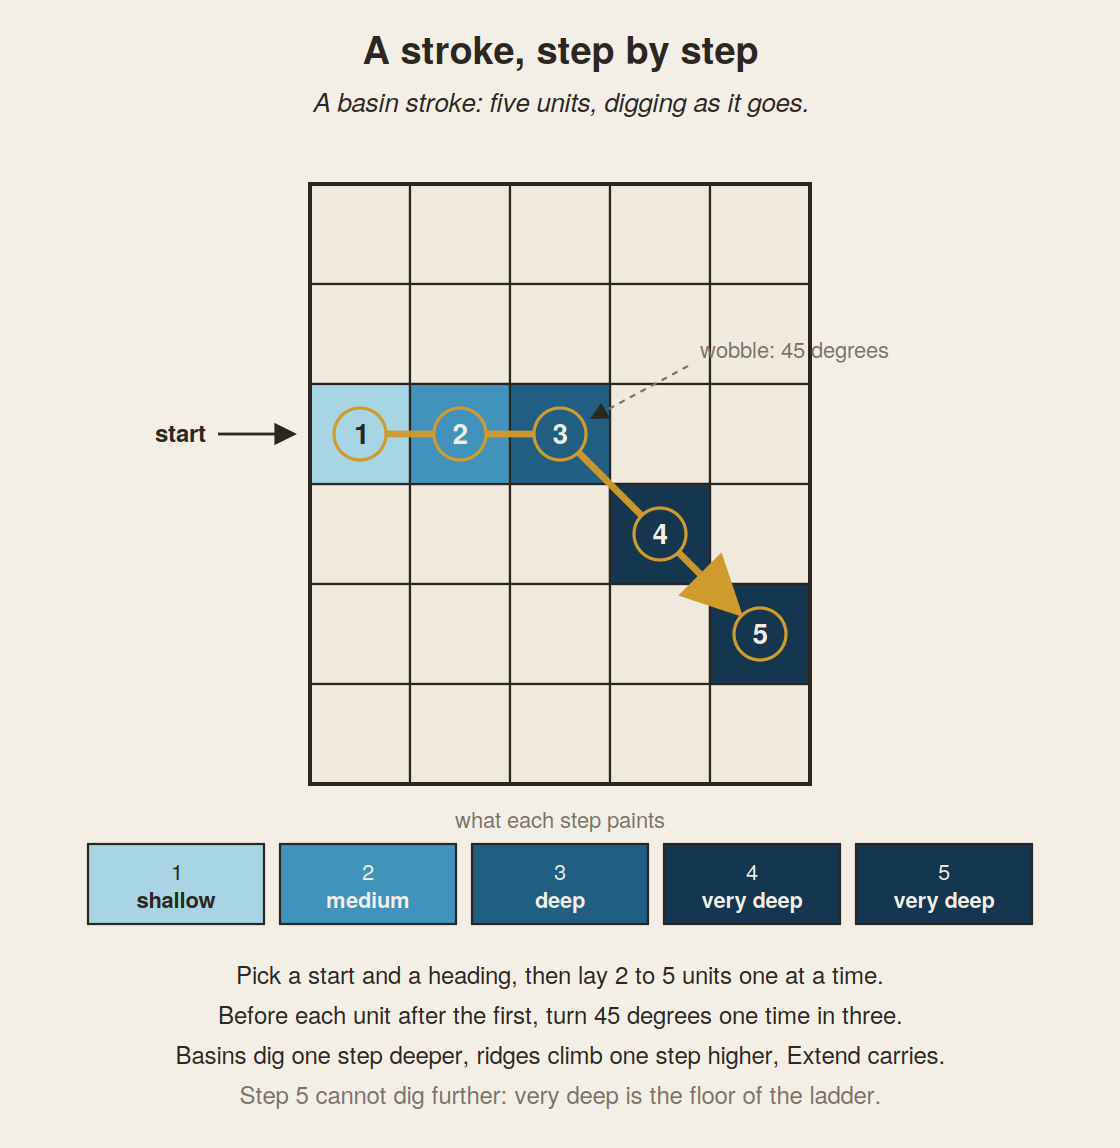
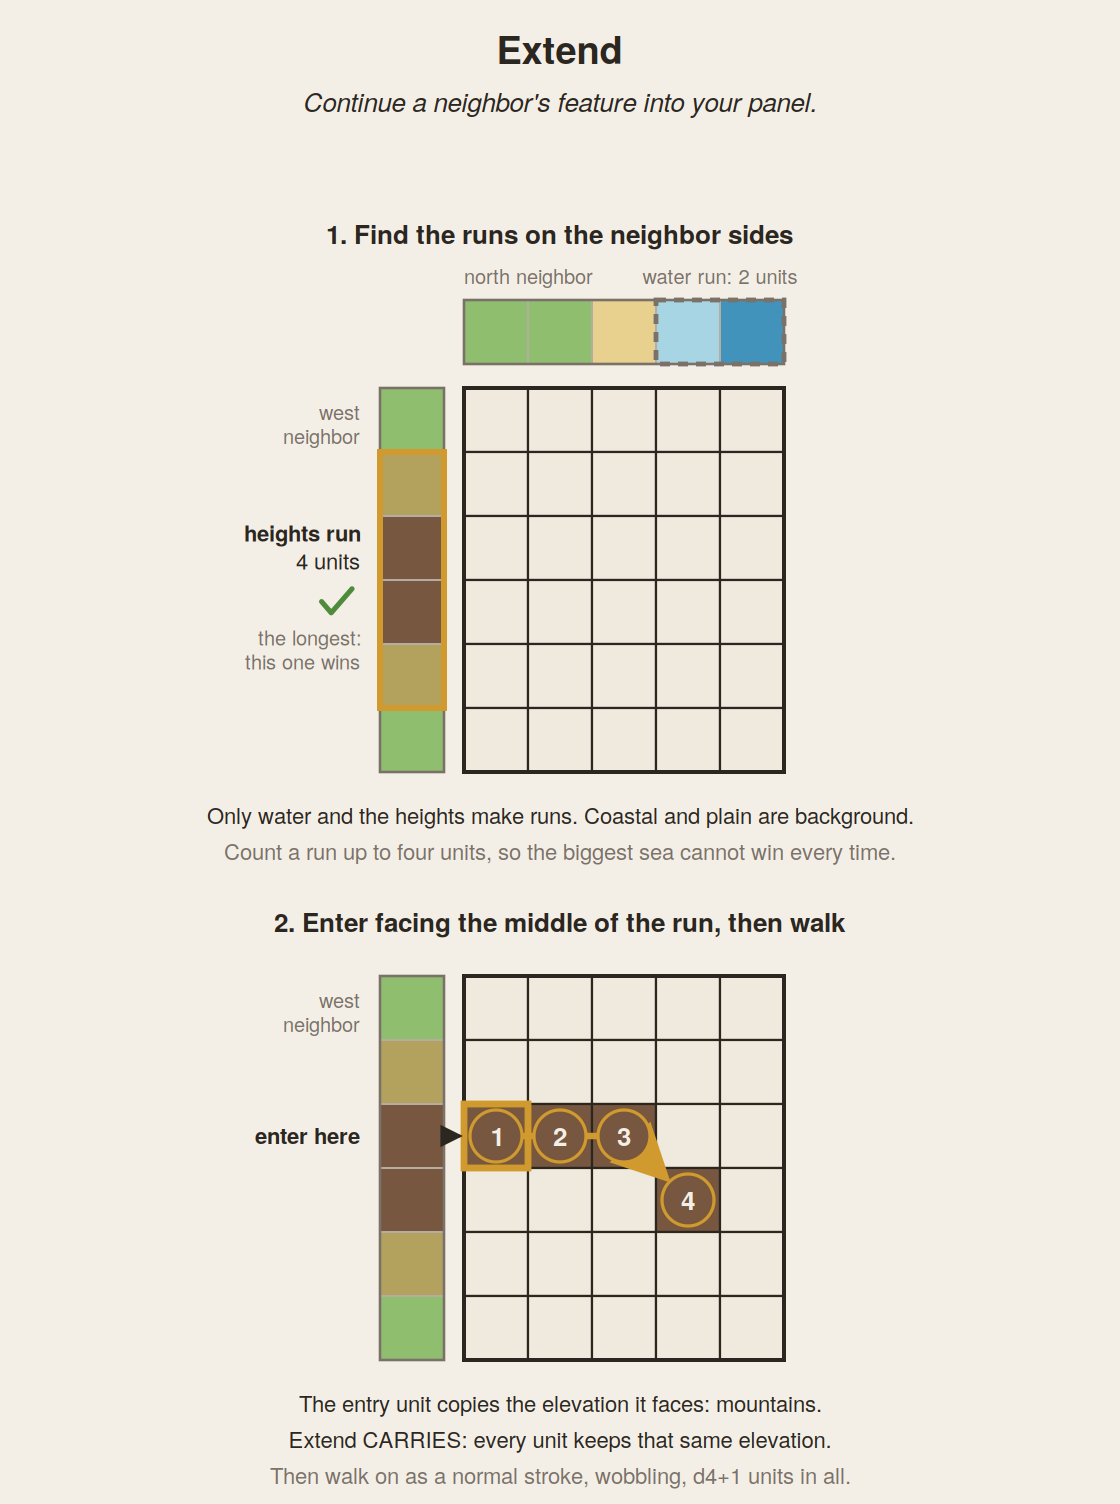
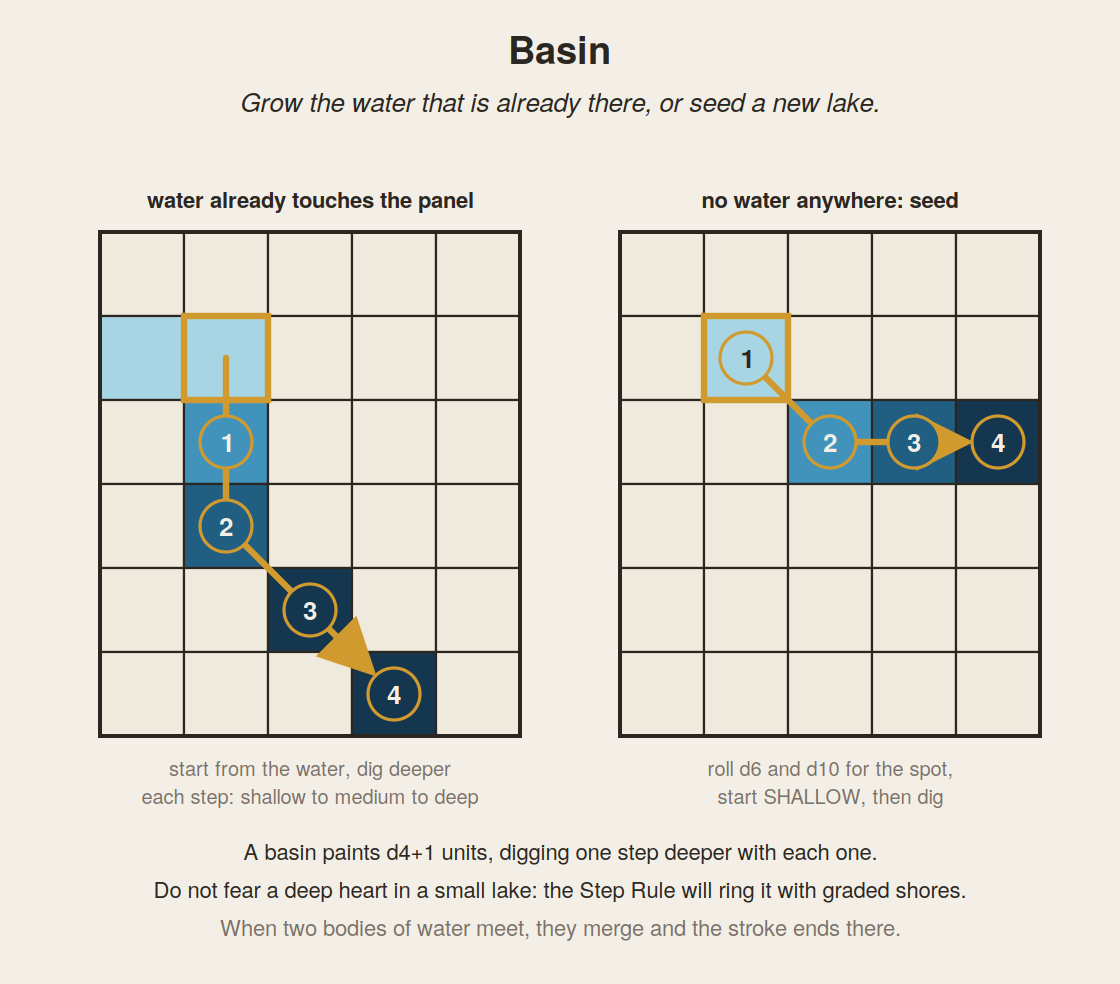
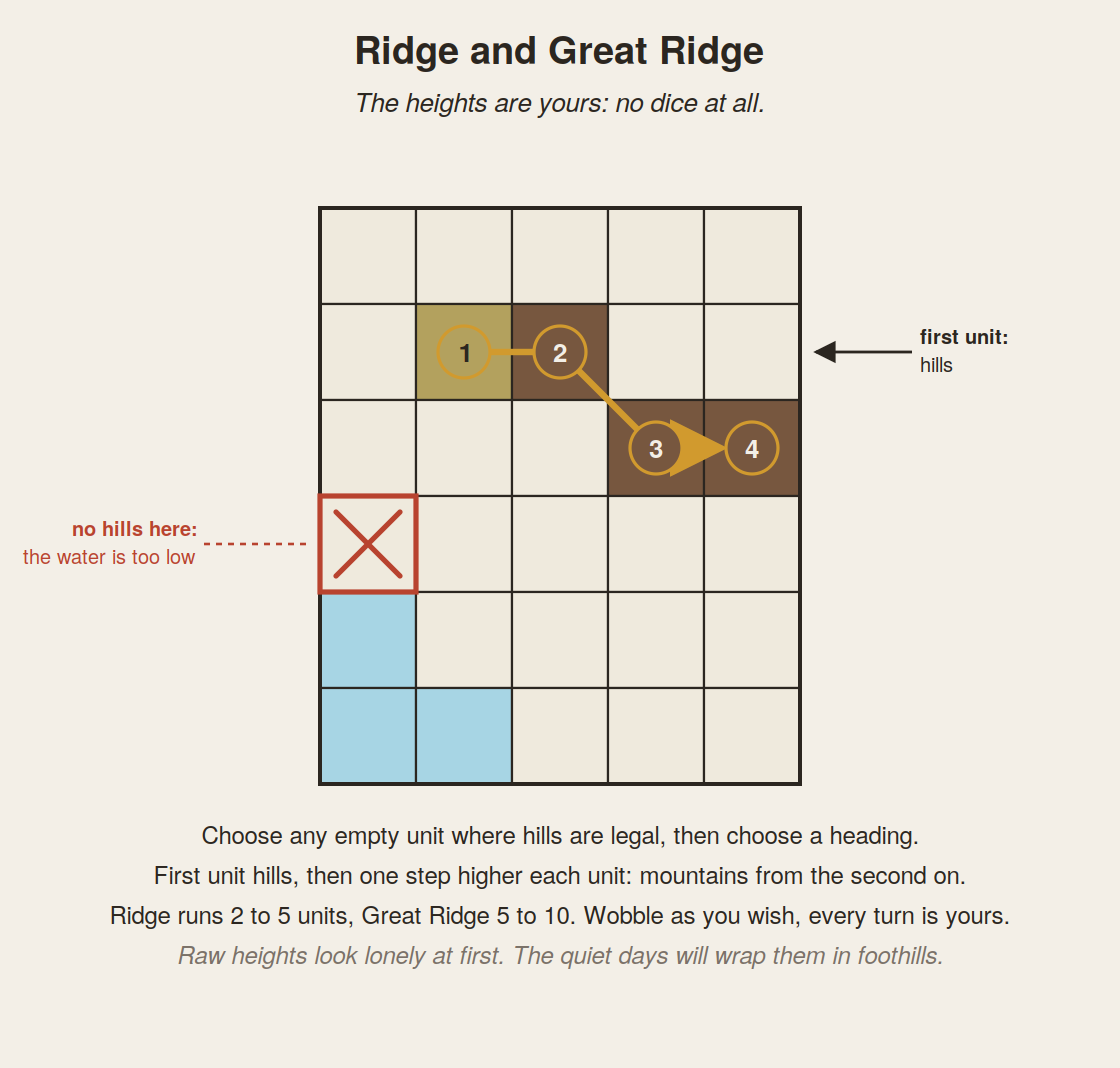
The stroke is the shared mechanic behind Basin, Ridge, Great Ridge, Free Stroke and Extend instructions.
- Pick a start unit and a direction. Diagonals are allowed. Each card's entry says where its stroke may start. Where it says you choose, choose freely, randomly, or roll dice for a starting unit.
- Pick a length: 2 to 5 units (roll 1d4+1, or choose). Great Ridge: 5 to 10 units.
- Lay units one at a time along the direction. Borders do not stop a stroke: it walks across panels. The map's edge ends the walk for good, and no stroke ever creates a new panel.
- Wobble. Before each unit after the first, turn 45 degrees about one time in three, evenly left or right (d6: 1-4 keep the heading, 5 turn left, 6 turn right).
- Move the elevation by 1 after each step as the card commands: basins dig one step deeper, ridges climb one step higher, but Extend carries the same elevation.
- Merging is good news. A stroke that meets its own kind joins it: two seas become one sea, two ridges one range, and the stroke ends there.
- Everything else ends it: a foreign feature ahead, the Step Rule, or the length running out. Features are allowed to end.
- But the walk goes on. A stroke always walks its whole length. When it ends early, keep walking the steps but instead of filling, you do decorations/reworks on filled units along the way. A stroke's energy is never lost: what it cannot carve, it decorates.
The exact rules: Master Manual, chapter 8.
Chapter 06
The cards
The deck, 22 cards:
| Copies | Instruction | Filling Work | Mood |
|---|---|---|---|
| 7 | Calm | 5 to 7 | Level |
| 4 | Settlement | 6 to 8 | Settle |
| 3 | Basin | 6 to 8 | Settle |
| 2 | Free Stroke | 6, 8 | Settle |
| 1 | Extend | 7 | Settle |
| 1 | Ridge | 7 | Rise |
| 1 | Great Ridge | 7 | Rise |
| 1 | Anomaly | 7 | Rise |
| 2 | *Add Panel | 3, 5 | Settle |
| *The two Add Panel cards sleep out of the deck for the first era and join at the back when era two begins. |
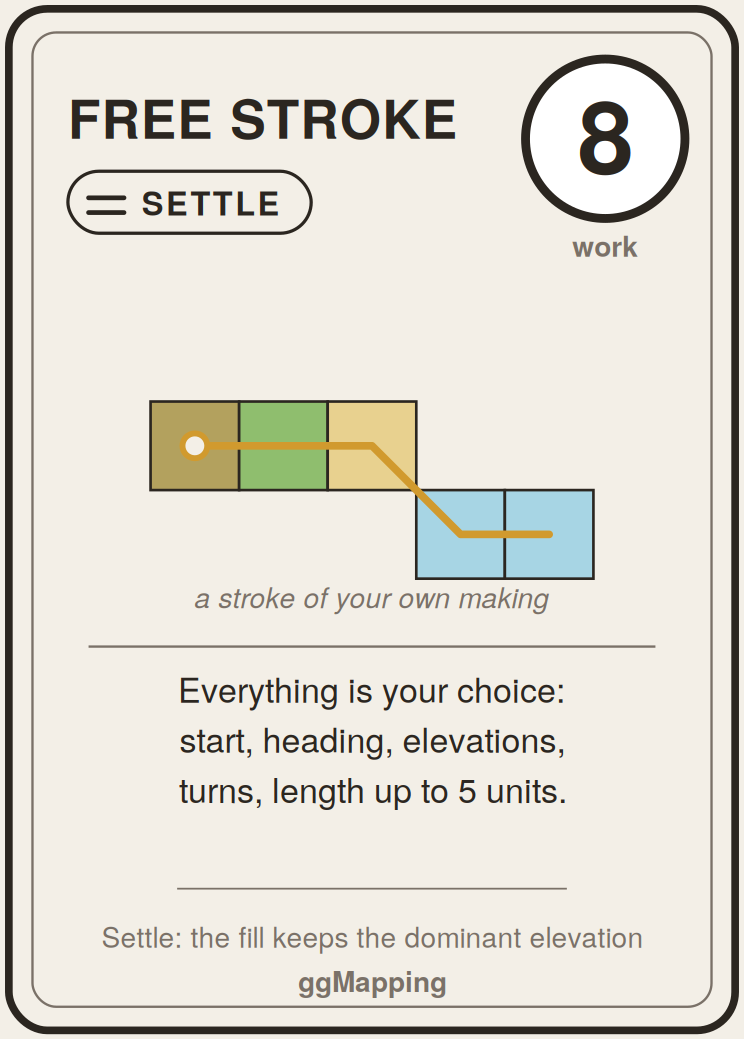
HERE is a link of a printable document with all the cards: https://drive.google.com/file/d/1CVBCDG6nfsf6vPZVkXyCsEq-WNDPUqYm/view?usp=sharing
You're invited to design your own cards, to decorate them. Working on the cards is as much fun as working on the deck itself.
Cards instructions
Calm
No instruction, just do the filling work.
No one? Then roll a d6:
| d6 | Founding |
|---|---|
| 1-3 | A farmstead: 1 rural home and 1 farmland |
| 4-5 | A village: 2 rural homes and 1 farmland |
| 6 | A small town: a low urban core with homes on every side (ring first), and 1 farmland |
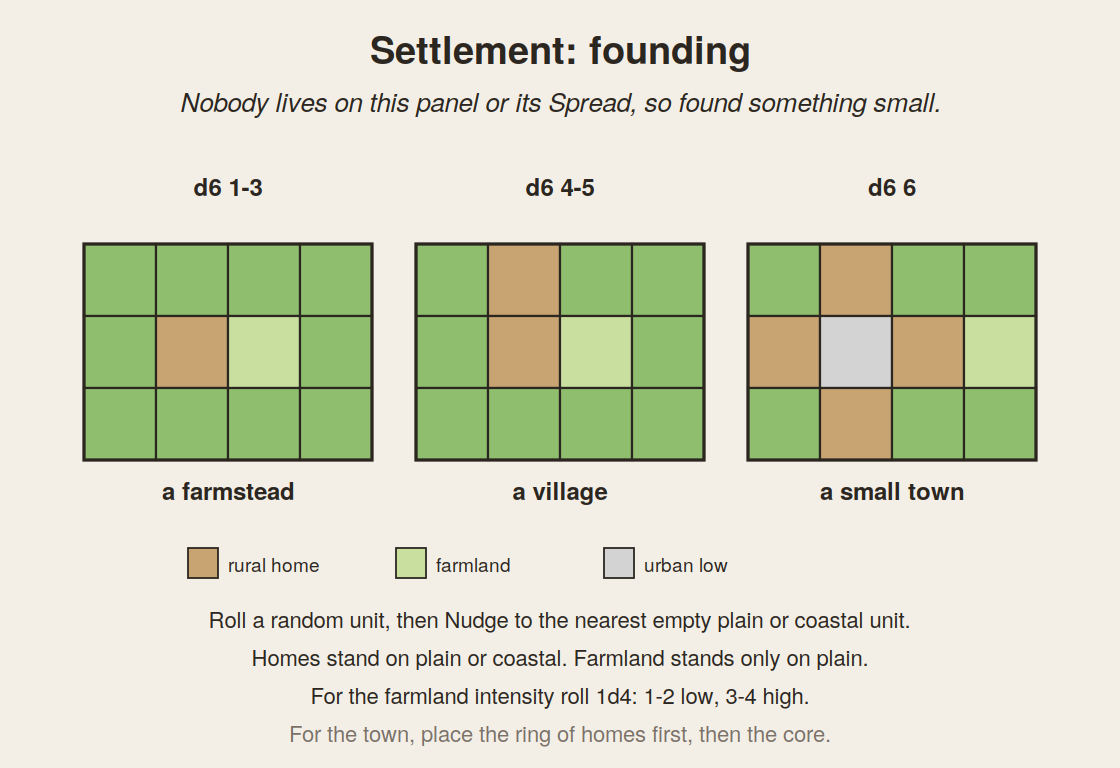
NOTE: Founding needs painted ground: homes stand on plain or coastal units already on the map, and the word "empty" in the people rules means no people on it, not unpainted. On a mostly blank panel there may be no legal home.
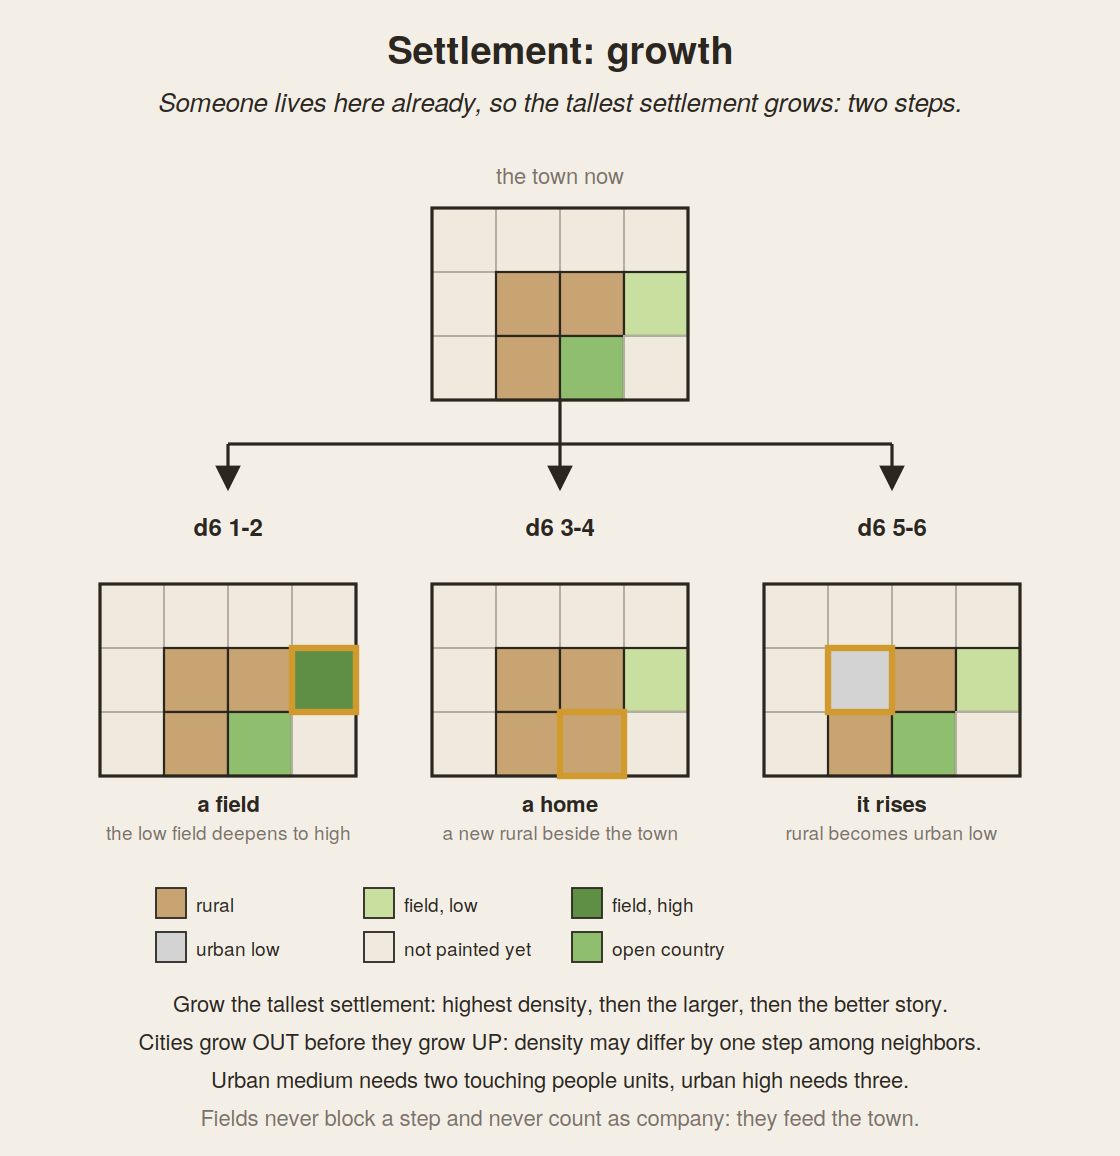
Someone already there? Then grow. The tallest settlement takes two growth steps. Each step, roll a d6:
| d6 | Growth step |
|---|---|
| 1-2 | A field. Deepen a low intensity farmland to high intensity first; otherwise plant a new farmland, always low intensity |
| 3-4 | A rural home beside the busiest part of town |
| 5-6 | A rise in density: rural to urban low, low to medium, medium to high. If nothing can rise, a home instead |
| Note: If growth cannot happen (e.g. no legal space for farmland), then do a rework instead. |
Urban density ladder
| City Density |
|---|
| Urban High |
| Urban Medium |
| Urban Low |
| Rural |
| Farmland can be Low intensity or High intensity |
People rules, in brief:
- Settlements stand only on plain or coastal. Farmland stand only on plain: roll 1d4 for the intensity of a new farmland, 1-2 low, 3-4 high.
- People keep their own step rule: among plain and coastal neighbors, density differs by one step at most. Cities grow out before up!
- Company: urban medium wants 2 touching people units, urban high wants 3.
- Farmlands are not cities. They never block a step, never count as company, are never blocked. No home on a field, no field on a home. Fields feed the town, they do not crowd it.
- Ties for tallest: grow the larger; still tied, the one with the better story.
Anomaly
Want your "other dimensions" feature? This is the card made for it! The one license to break the rules, once, at placement. It may repaint anything and ignore the law as it lands. Afterward it restricts nothing, and your anomalies follow nothing but your rules. Make your own anomaly table; the Master Manual carries a good one to start from.
Add Panel
Put the new panel at the open position closest to the middle of the map; ties prefer a loose end, where water or heights meet the void. It is your working panel this turn, and its first units grow inward from the border it shares with the map. No panel is born blank. Tip: Use the online map digitalizer to easily spot the best place for a new panel.
If an instruction cannot result in paint, then it becomes rework (chapter 7).
The exact rules: Master Manual, chapter 9.
Chapter 07
When something cannot happen
Cards are ALWAYS effective, but sometimes the instruction cannot be executed, either because of rules restriction or because the panel is already completely painted. In that case apply the nudge or the instruction become a rework task.
- The Nudge. If a unit cannot take what you must place, slide to the nearest unit on the working panel that can. The Nudge never leaves the working panel. Ties: your choice.
- The Rework. If the instruction cannot happen at all, or the panel is full, decorate instead: work the same units the instruction would have touched, without changing elevation. Waves on the deep sea, roads, collages, a festival in the city, etc... Reworks are what makes an old panel look loved! Blank units are never reworked. (The simulator's records say embellish for a rework, and waymark for a settlement that found no home: a small sign of the visit, placed where you like.)
- The pass. Blank units are never reworked, so on a panel with no painted units at all, a failed instruction simply passes: note it and paint on, the card's fill still happens. On a young map instructions fail often for the first few ages. That is normal, and every card is still a full card of painting.
- The healing. While reworking, a coastal unit with no water on any side may become plain: the shore forgets its sea. Beyond that, artistic freedom over reworked ground. Use it like salt.
The exact rules: Master Manual, chapter 4.
Chapter 08
Adding new cards
You're free to add cards and instructions as you wish! But be mindful, adding a new card is an action that can have profound effects on your map.
Here below some suggestions:
- Keep the average work number of your cards close to the starting deck's, about 6.5
- Keep the number of instructions balanced as the initial deck (e.g. 1 every 20 is an Anomaly)
- Use the same mood for all the instructions as the initial deck (e.g. Great Ridge is always Rise). Or keep the mood mix near the starting deck's: about 12x Settle, 7x Level, 3x Rise in the 22 cards.
- If you implement a "Remove Card" instruction, make it a one-shot instruction that applies only when the deck size reaches a threshold. A "Remove card" instruction tends to destroy your deck over time.
- Add a "Shuffle Deck" instruction only when the deck size is considerable. Frequent re-shuffling can negatively affect cards exit balance, thus the map balance. Shuffling when all cards have been drawn ensure that all cards are executed at least once.
NOTE: If you decide to keep your map at a fixed size. Some players choose a final size in advance, for a frame or a wall. A map that has stopped growing still draws the same cards, so anything that scars the land (like the Void on Jerry's map) keeps arriving at the same rate on a world that can no longer spread it out. The Anomaly is the one to watch: design it gently for a bounded map, with fewer copies or kinder outcomes.
Chapter 09
Higher dimensions and anomalies
The higher dimensions are probably the most fascinating and original concept on Jerry's map. Here below you can find a pre-made table and rules to use the anomaly card as gate for higher dimensions, this table and rules are for you to change, feel free to edit and make it your own.
When you pick an anomaly card, you roll a d12
| d12 | Anomaly |
|---|---|
| 1 | Lone island: repaint one water unit as hills. |
| 2 | Next higher dimension: 1d10+1 units of a higher dimension blob. |
| 3 | Crater lake: repaint one mountains unit as shallow. |
| 4 | Archipelago: roll d4; repaint that many water units as coastal islets, each within 2 units of the last. |
| 5 | Next higher dimension: 1d10+1 units of a higher dimension blob. |
| 6 | Trench: repaint one water unit as very deep. |
| 7 | Mesa: paint one mountains unit on or beside plain. |
| 8 | Next higher dimension: 1d10+1 units of a higher dimension blob. |
| 9 | Volcano: paint one mountains unit and give it a red cap. All surrounding units around the volcano become hills (settlements get destroyed). |
| 10 | Next higher dimension: 1d10+1 units of a higher dimension blob. |
| 11 | Old ruins: mark one unit with the ruins pattern (broken houses), far from any settlement. Ruins are a memory, not people: they never grow and never count for any people rule. |
| 12 | Wonder: Something special has happened to this unit, be creative! |
Next higher dimension instruction
Fill 1d10+1 (2 to 12) units of contiguous new dimension, you chose the starting point or randomize it. Start from Void dimension (level 0), if you hit a higher dimension roll on the same panel, then upgrade the existing higher dimension units by 1 level following the step rule as you would for elevations.
| Dimension | Description | Level |
|---|---|---|
| Void | Completely white collage, nothing can overlay here, only further dimensions | 0 |
| Populated Void | Black and white collage, settlements can spawn here. | 1 |
| Red Dimension | Red palette collage or painting, settlements can spawn here and old ones survive. | 2 |
| New earth | Dark beige collage or painting. These units count as non-filled blank panel units (color of your choice), the map starts over. | 3 |
Chapter 10
Notes on randomness
Here is the honest truth this book is built on: people are poor randomizers. We streak, we favor, we repeat. Left to instinct alone, every ridge bends the way your wrist bends, every sea grows toward the same corner, and the map fills with your habits instead of a generated world. As Jerry once said "I try to think as little as possible".
How you randomize is your taste, and all ways are equal: dice, percentages on a phone, a coin, a spun pencil. And the deck itself is your biggest randomizer: it decides what kind of day the map is having. Trust the deck. It is the calibration, tuned by many hands before yours.
Where the rules say your choice, they mean it. Choose with taste: vary your headings, break your own streaks, and once in a while do the thing you were avoiding. The best maps are half law, half weather, and the weather is you.
The exact rules: Master Manual, chapter 10, and everywhere the dice are printed.